Sunday, September 30, 2007

Ultramarine Blue the Hard Way

I’ve been pretty busy with the project this week. First off, I’ve got a spiffy new Project Status Banner at the top of my blog, for easy reference on how far I’ve come. Also, I’m drying out and prepping the green copper rust from last week (hopefully I’ll be able to make it into a pigment for next entry). The blue clay that I’ve refined is taking a VERY long time to dry. I don’t think it’ll make a good grey pigment, but I might as well run the experiment through its paces.

Lastly, I’ve finally gotten around to grinding and mixing the Lapis Lazuli that I picked up at Mountain Gems in Burnaby. The folks at Mountain Gems were very helpful and friendly. I called ahead before I showed up to see if they had any in stock. Not only did they have some, they also emailed me a link on how to prepare it for paint! Talk about great service.

For those not in the know, Lapis Lazuli is a type of rock that used to be made into a pigment for tempra and oils back in the day. When we discovered a way to make the Ultramarine Blue synthetically, its use as a pigment diminished. This is fine, because it’s a beautiful rock for many other purposes (carving, etc). Note to any stone sculptors and jewelers out there: If you’re doing any Lapis sculpture, please contact me so I can take the unusable chips off your hands! This stuff isn’t cheap!

Here’s the samples I bought, with one small piece already crushed. When crushing, it gives off a distinctive odor (which prompted me to put on my painter’s mask). It smells like a hair salon when someone’s getting a perm!


Here’s a sample of the pigment mixed with walnut oil. Note that it is a bit greyer and duller than the stone. That’s most likely due to one of two things: The impurities in the cheaper Chilean stone is diluting the color, or the act of crushing the stone is making it duller. Art Graham mentioned that this can happen to cobalt blue if you create a dispersion incorrectly. (see factory tour notes)


This final shot shows the difference between my first and second batch. The first batch looked really dull to me, and my guess was that my tools were not clean enough (the copper test rusted my palate knife. I thought I got all the rust off, but looks like I was wrong)

Monday, September 24, 2007

Copper, Now with Ammonia!

After finally getting a hold of a bottle of Ammonia, I was able to try out the original, unaltered patina recipe. Here’s the recipe (courtesy the Urban Farmer Store) and my results:

2 cups White Vinegar
1 ½ cups Ammonia
½ cup kosher or sea salt (according to the recipe, more salt = more green, less salt = less green)

By the way, the vinegar and ammonia each had a powerful smell, but once this was all mixed together, the smell was not bad at all.

Day One: Cleaned and scoured out the copper post-topper, then filled with clear liquid.


That evening, the solution had turned a wonderful blue hue.


About 4 days later, here are the results, with still a little liquid at the bottom. As I put less salt into this batch, there are a lot less crystals.


Eight days after making the batch and it is dry. Note how the color at the bottom is more blue than the rest. This may be due to it getting rained on outside last night (I left it outside to dry out a little faster and forgot to bring it in).


I did a little research on how to make vinegar and ammonia from scratch.

Vinegar won’t be hard… I have a friend who has made a few bottles accidentally when home brewing. Ammonia will be a bit harder. Today it’s made using the Haber Process, which uses high pressure (200 atmospheres) and high temperatures (450 C) and an iron catalyst to get Nitrogen & Hydrogen to react and form Ammonia. There are some other historical ways to produce it, and I may try those (playing vegetable and animal waste products… joy.). My other substitute (see last entry) seemed to do a pretty good job, but it began to smell pretty bad towards the end of the experiment.

So, I’m going to do a matrix test of the four ingredients (salt, vinegar, ammonia, and ammonia substitute) to see if I can eliminate any one of them. Here’s my two test sheets:

Monday, September 17, 2007

Go Green!

Right now I’m facing a catch-22 regarding my first production batch of pigment. I need to make some pots in which to refine my pigment more, but in order to do that I need a kiln. Although I have some clay to make bricks or pots, I don’t have anything to fire them in…

That and I don’t think my landlord would really appreciate me making a bonfire on his property to pull this off. This sort of thing needs done at my parent’s property.

So, in the meantime, I’m trying to expand my color palate. I’m about 1/3 of the way through tests for creating a copper green pigment. Here’s what I’ve got so far:

I found a recipe for patina on the web, which consisted of only three ingredients: Sea/kosher salt, White Vinegar, and Ammonia. We had the salt and vinegar at home. Believe it or not, finding a cheap $3 bottle of Ammonia was *not* easy. I called or looked in over five stores before I found it in stock at Safeway. Why so scarce? My guess is that it’s a cheap ingredient used in the manufacture of meth, so people are either buying up all the stock, or stores are not selling it to attempt in vain to cut down on meth production. Come on everybody! Haven’t people figured out yet that speed kills? Now it delays art projects too.

So, while I was looking for ammonia, I tried a substitution for my first batch… one that would be easier to make from scratch too. Let’s just say that it’s a) it complies with my ‘from scratch’ rule set b) a liquid and c) I can currently manufacture more in a week than I’ll probably need for this entire project.

I also tried just using lemon juice for a second test, but it just resulted in making a green snot-like goo. When I added alcohol to it, it looked pretty bad.

Both batches on day 2 or so


Day 3 or so: Crystals began to form


Close up of crystals


Day 5, Had been left outside for a while, including a light mist of rain.


Icky green goo from dehydrated lemon juice. I couldn’t tell if the green color is from the copper or some nasty bacteria. So, I mixed it with alcohol to see if I could sterilize it and separate the pigment out.


Final bottled samples. Middle sample has settled since this photo and all pigment and salt is at the bottom.

Monday, September 10, 2007

Color #2: Lamp Black

I was going to talk about the blue clay that I got from a coworker, or perhaps a list of all the things I can use now that my starting point is 4004 BC, but there’s a new development that is much cooler. Except for two tools and a paint brush, I just came up with a production batch of Lamp Black!

When I told my wife the difference between proof of concept tests and productions runs, she exclaimed “That means you have to do everything twice!”

Um, yea. At least twice. Usually it takes more tests before I can go into production. But this one was proven out on the first try and that means my next batch will be production ready!

Here’s what I did:

I couldn’t find my beeswax candles, but I did find some beeswax in my art supplies for Ukrainian Egg Decoration. Why beeswax? Humans have used it for at least 10,000 years (presuming of course that the earth existed for over 10,000 years. For the scope of this project, the world was created in 4004 BC, or about 6011 years). There is even evidence of it being used at Lascaux.


I created a wick from the retted flax that was donated by Wild Rose Fibres, and inserted it into the hole I made with a screwdriver (1st tool that was not from scratch)


After lighting the candle (wood fire is from scratch, as there is evidence of it being readily available to our ancestors in 4004 BC. So, I felt a wooden match was OK to use. Note that I didn’t use the bic lighter in the photo, as the end result was much the same), I held the copper over the flame, and collected the soot.


I tried to find raw copper sheeting to use as a smooth surface. No such luck at 6pm on a Saturday. But these post toppers at Home Depot did a wonderful job. One note: copper conducts heat *very* well. Watch your fingers!


After scraping the soot off with a palette knife (2nd tool not from scratch), I mixed it with walnut oil. Success! The end result is a very black, very smooth paint. Apparently this is the same pigment used for India Ink.


More on clay and other reasons why I bought copper post toppers next time.

Friday, September 7, 2007

Priceless Art

Over Labo(u)r Day weekend we were in Tacoma, Washington meeting my parents halfway from Portland. They brought up my production batch of pigment. (See previous video entry where I make a fool of myself). As you can see, we kept such a valuable item in a ‘safe’ place.


When I brought it home, I went to work on it separating the coarse back from the finer silt front. As I had to do this ‘from scratch’ I used a broken piece of old bamboo, instead of a carving knife as I did with my proof of concept batch. Compare the level of impurities to the Proof of Concept photos. Looks like I’ll have to refine it at least one or two more times.


The good news is that a co-worker donated two 5 gallon buckets full of blue clay. Although it doesn’t look like this will be a good source of pigment just yet, I think I’ll be able to make some containers from it to enable me to do a much better refining job!

More on the clay next week.

Sunday, August 26, 2007

Drawing a Line in the Dirt, or Fall of the House of Ussher

A while back, I found what looked to be a cow magnet attached to a shopping cart. This confused me as I wouldn’t expect a cow magnet in the middle of a metropolitan area. My paranoia set in after a while, and I began to worry that it might be radioactive or unhealthy or something. (turns out it was part of a kid’s toy set of two magnets, that make noise when thrown up in the air together, so it’s probably safe as long as I keep it away from my credit cards)

While, trying to track down this particular cow magnet, I ran across a very interesting web page, made by
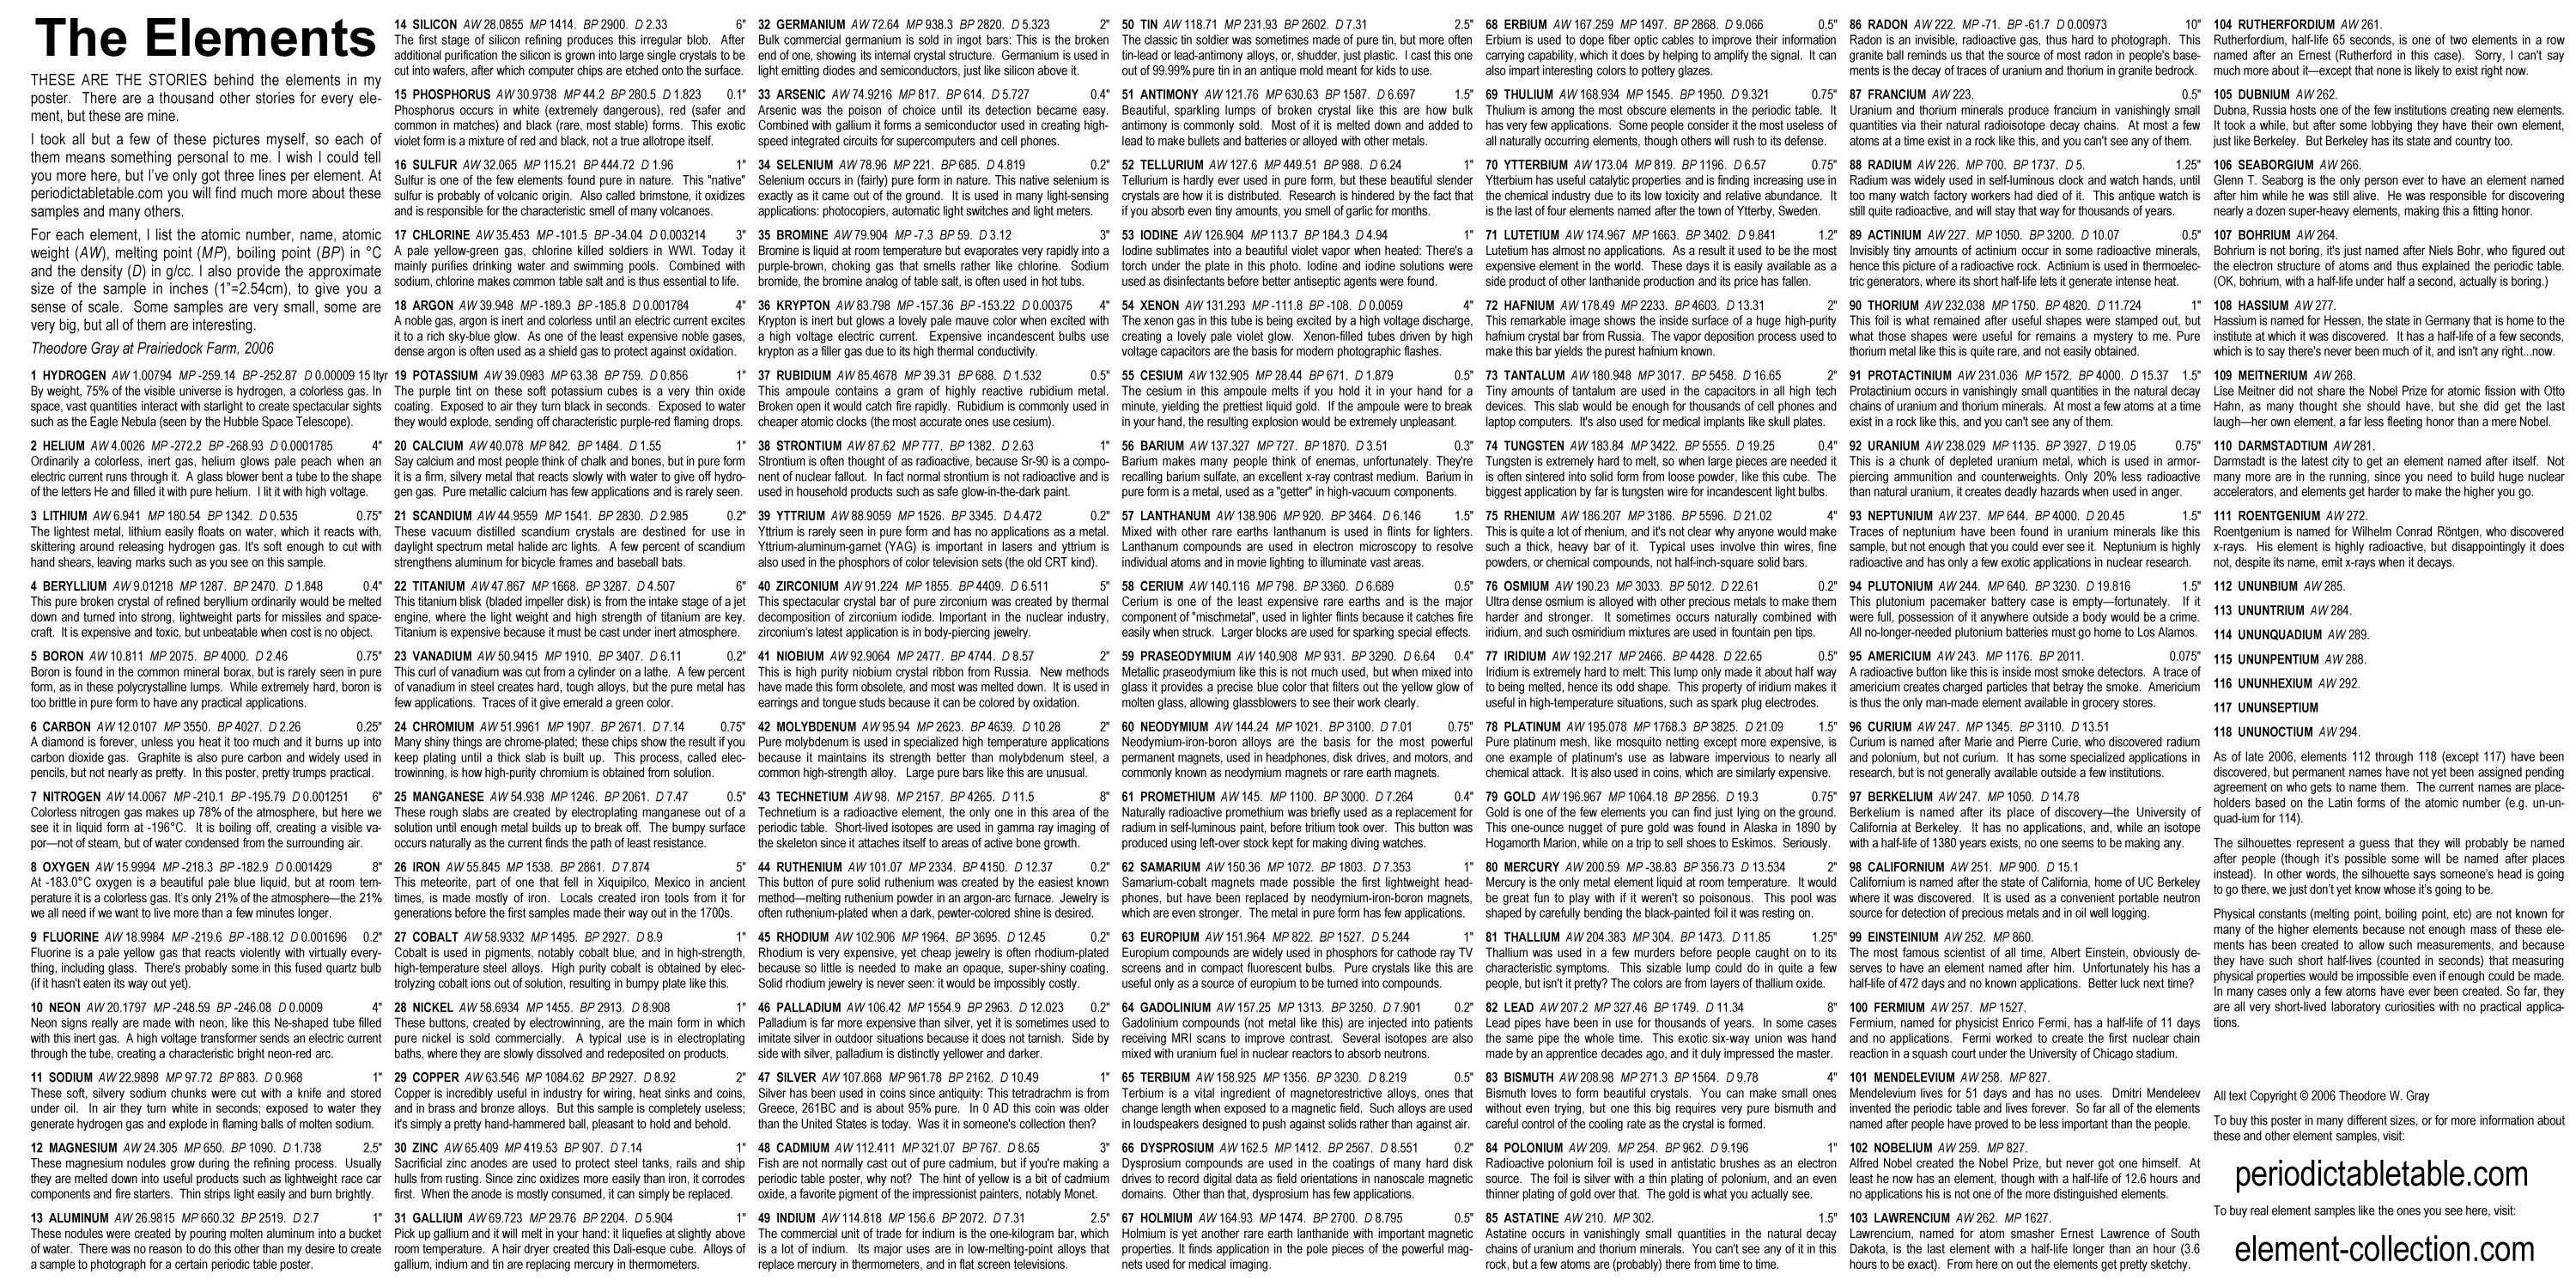
 Theodore Gray; the Periodic Table Table. It has photo examples of every element (those that one can take photos of anyway… Seaborgium, not so much) I couldn’t find a cow magnet, but I did find a photo of a metal ball
that I found in the streets of Seattle. His site explains the use of this odd looking pinball-sized sphere. How it ended up in a gutter in Queen Anne is beyond me.

Anyway, I mentioned my project to him, and we quickly struck up a conversation about it. He’s been very supportive, and held my feet to the fire on coming up with a clearly defined rule set. Here’s the email conversation:

Troy:
Perhaps the words 'naturally occurring' need to be looked at closer. They imply that humans are not part of the natural processes that takes place on earth, nor is anything we do. If you take a larger view of the world, and consider the human race to be part of nature, then our by-products are also an extension of nature. In this case aluminum powder is naturally found... in etch-a-sketches. Just like Plutonium can be naturally found, in breeder reactors.

Theodore:
Which is exactly the point I'm making in my description of those aluminum nodules. It's both arrogant and insecure of us to imply that anything we do is somehow fundamentally different from what chorals or algae do. If you were doing your project in Africa, would you be allowed to use savannah grasses? Because the savannah is grassland only because of human burning over hundreds of thousands of years.

I think the problem is where to draw the line, since by that argument, you could just go down to the store and buy anything you want.

You have to find a way to draw a bright line, no hedging or it's not art.

Here's one possibility: Assume there is a nuclear (or biological) war that wipes out the human race completely. You get to use anything that's still around a hundred million years from now. [let’s see, this conversation mentions breeder reactors & nuclear war… what are the chances that the NSA will be looking at my painting project more closely now?]

This eliminates all manufactured objects, everything made of iron, anything in a recognizable shape. But the aluminum nodules will still be washing up on the shores of the great lakes.

Troy:
I'm finding that I have to question everything, and I haven't been able to come up with a system that easily handles every situation. So right now, it feels like a wobbly line. I'm getting the feeling that maybe one system that would work is if I decide how many levels back or levels removed from my day job I'll go for any particular thing. Let me know what you think of this idea:

For almost everything I see in the world around me, it seems that at some level back, smelting & loom technology come into play. I've read somewhere that it is estimated that smelting has only been discovered independently 5 or 6 times. Amazing if true.

Theodore:
I guess the money aspect [buying material, like flax plants] doesn't bother me so much as what the materials are. As long as what you're paying for isn't processed in any non-trivial way, I don't see that the art is effected by whether you bought, borrowed, begged, scavenged, or stole it.

…You've got to have a headline, a soundbite, that is immediately understandable to explain why what you've done is interesting.

So, here's another random bright line you could try: Making a modern painting in 10,000BC.
Assume you, with all your modern knowledge and access to all the books and information resources you want, are dropped into the world in 10,000 BC and asked to produce a painting. (Connecticut Yankee in King Arthur's Court kind of thing.) …

Troy:
This concept is beginning to resonate with me. Maybe some tweaking here and there, but very close to what seems right. Loved that book by the way.


We also talked about the coolness incarnate that is Boeing Surplus,
which turned out to be good timing for Theo, as he was planning a trip to Seattle right around the time we were talking.

He came back with some nice samples:
Boeing Contributions
Aluminum Samples

By the way, if you want to get yourself or a friend an engaging Periodic table poster, buy one from Theo. The placemat version has educational and witty text describing each element on the back.

ACTUAL STARTING POINT
So, Theo has tasked me to find a suitable starting point in time. Anything that existed on or before this date I can consider ‘From Scratch’. I did my research, and have found a very clear, if somewhat controversial date: the date of the earth’s creation! To the day! I needed to find a scholar that has been respected for quite some time, well over a hundred years. I found that in James Ussher (1581-1656) Anglican Archbishop of Armagh (Ireland).

Ussher deduced that the first day of Creation began at nightfall preceding Sunday October 23, 4004 BC. So, let’s make our starting point, October 31st, 4004 BC. This gives us a little slack, just in case James made a rounding error. Also, Halloween is an easy date to remember.

As much as I respect the (arduous) efforts and results of Archbishop Ussher, I also respect the findings of modern archeologists. I believe them when they say they’ve dated an object to be older than Oct 23, 4004 BC. How do I reconcile this? The easy way out is to say that the dating is wrong. This is a cop out, and I don’t cotton to this line of thinking, particularly since these dates have been made much more accurate with newer dating methodology. One could also argue that any artifacts older than this date (like tons of pottery, large buildings in Egypt, etc) were put there by the Creator to tempt the faith of archeologists, scientists, and ‘end-time’ society. Maybe. Not saying it didn’t happen (as there is no way to prove it wrong, and more to the point, I personally believe in a creator with an extreme sense of humor).

I’m taking the hard line of living with a paradox.

Next time, we’ll go into detail about what can and cannot be used for this art project.

Sunday, August 19, 2007

Cavemen: Not So Wimpey

I took some videos of my trip to Colton, Oregon last week, and have not one, but three clips to show you!

We’ve got some successes: a production run of refined pigment (my arms are still sore from this exercise!) & I found a new color source (burnt soil is much more red).

Also a couple of minor setbacks: The flax isn’t growing as well as I had hoped, and not only is it hard to remove soot from a stone, but grinding up charcoal doesn’t make for a good paint pigment (too coarse).

It’ll all make sense when you take a look at the photos and videos.

Woeful Flax


Attempt at Getting Soot


Burnt Soil Find


Refined Pigment Production Run


Here’s the dried silt from the refinement production run. Not bad for just using a rock, a stick and some water!


Here’s a Proof of concept shot of all three pigments: Soil, charcoal & burnt soil.